When I was asked to make my first ever castle cake last year, I consulted Mr Google to see what hints and tips he might have in the form of tutorials. I discovered a lot of Disney-style fairy tale princess type castles out there, using ice-cream cones as turrets, but nothing much in the style I had in mind. This first cake was a great learning experience and so when I was asked to do the castle cake for last week's party, I had a clear idea of what I was going to do and decided to take photos as I went along so I could post a tutorial.
So here is how I went about making this latest cake:
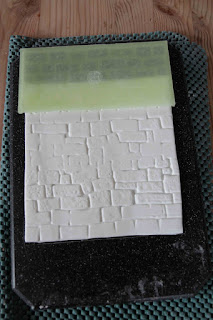
This first step can be done some days in advance. I rolled out a thick layer of gumpaste and cut it into a rectangular shape.
As a 'template' for the turret I used the inner tube from a roll of gift paper (covered in clingfilm). The width of the rectangle has to be sufficient to go around the tube with a slight overlap (or at least at the very minimum so that the two edges can abut).
The length corresponds to the desired height for the turrets - I guesstimated the height of the baked and covered cake then added on enough that I thought would give me the proportions I was after. There's no hard and fast rule, just what you think will look good to your eyes.
I have the FMM cobblestone and stone wall impression mats, so I used the stone wall one to give texture to the gumpaste.
Once this was done, it was 'simply' a case of wrapping the gumpaste around the tube, and


securing it with sugar glue:
The turret was sturdy enough to stand around the tube without sagging, which would mean that it could dry without part of the stone impression becoming flattened.
Before the gumpaste started to dry, I then put in the arrow slits by first cutting a vertical line
and then using the small end of the ball tool to put a circular indentation at each end.
I then used the sharp end of the dresden tool to open up the slit.
The turrets were left to dry for several days (the photo makes this one look wonky, but it wasn't).
Next job is to get the board ready for the cake. I covered it in sugarpaste and then used a new sponge to give it texture.
I then airbrushed the board. I wanted the castle to be mostly surrounded by moat with a small area of grass at the front for the drawbridge to go on to.
There was no need to airbrush right into the middle of the board since the cake would be sitting there.
Next time I will show you how I made this scrummy chocolate cake look like the castle in the picture at the start.


This is awesome! Thanks for the step by step! The "brick" impression mat is on my current wish list!!
ReplyDelete