Showing posts with label cake making. Show all posts

Thursday, 16 February 2012

American Style Cheesecake - Baking with Kids

...or, if my son had been naming this post, it would be


How to Make a Munchy-Crunchy-Cake

which is what he decided to call the cake half way through making it.

A little while ago I discovered Renee's blog (Kudos Kitchen by Renee) and was particularly intrigued earlier in the week when she posted a recipe for malted Milk Ball Cheesecake. In the UK cheesecake recipes aren't usually cooked, but it seems that American style cheesecakes are a baked delicacy. I love malty flavoured things, so I thought this would be a brilliant recipe to try out with the kids. I've changed it slightly...Europeanised it a little I guess, but hopefully not enough that it's untrue to its origins.

You can see Renee's original recipe here; my recipe is below:


For the base:

choc chip cookies (2 packets - approx 400g total)
white OvaltineTM powder (1 tablespoon )
melted butter (85g)

For the filling:

mascarpone cheese, softened to room temp (500 g)
self raising flour (1.5 tablespoons)
MaltesersTM (a 230g pouch)
white OvaltineTM powder (2 tablespoons)
caster sugar (225g)
crème fraiche, at room temperature (100g)
vanilla extract (few drops)
3 large eggs, at room temperature
grated chocolate for topping


Renee's recipe tells you to put the cookies in the food processor & whizz them up, but it's much more fun to put them in a bag, arm your three-year-old with a rolling pin and tell him to whack them to bits. In this photo it looks like he's rolling them but he was actually perfecting a two handed smashing action!!

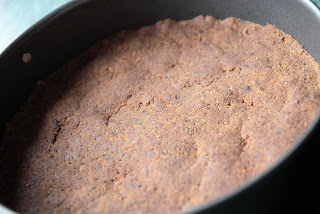
We then combined the cookie bits with the butter and the OvaltineTM powder in the food processor and blitzed them until the mixture started to come together in clumps. We then squished it all down into a 9" baking tin. We popped it in the oven at approx 170C for around ten minutes and then set it aside to cool a little.


Meanwhile, we got on with making the filling. With Mrs B's help we whipped the mascarpone, flour, OvaltineTM powder and the sugar into  a lovely creamy mixture. We then added the crème fraiche and vanilla and lightly mixed them in (although there is a certain lack of finesse in a three-year-old controlling the on-off button of a powerful mixer!). 


We then added the eggs one at a time, slowly mixing them well in, before adding the MaltesersTM. Renee's recipe calls for the balls to be chopped in half...however, the unbridled enthusiasm of my son resulted in the whole pouch being emptied straight in to the bowl and mixed in:


We then poured the mixture into the tin and popped it in the oven at somewhere between 170-180C for an hour. I'm guessing that had we chopped the balls they wouldn't have all floated to the surface...


After an hour it came out looking like this:


and smelling DELICIOUS!!!

Although unplanned, the fact that the MaltesersTM formed a lovely caramelised layer on top of the smooth creamy-cheesy layer really made this for me, and I think it suits the munch-crunchy-cake title quite well! I think I am definitely a convert to baked cheesecake. It is quite different to what the British would usually call cheesecake, but it is worth the extra time and effort to make it - yum!!   


Sunday, 12 February 2012

Guest Post - How to Make a Cute Coconut Cake

I am very excited today to be hosting my first ever guest post. Damian Wolf  is a part time blogger and online enthusiast. He contributes to many blogs, including cake decorating course Sydney , which is considered as one of the sweetest Australian websites. He has kindly offered to share with us his recipe for a scrummy coconut cake - read on below...


You will be the hit of the party or get together with this fantastically creative and delicious coconut cake recipe. Just about everyone loves coconut, and just about everyone loves cake. When these two favourites collide, it is like tasting a sweet tropical paradise. With its sprinkled coconut icing, this scrumptious desert adds a special touch to any celebration. This coconut cake takes the cake indeed!

Don’t worry if baking is not your specialty. This recipe is foolproof and very easy to follow. First, we will bake the two layers of butter cake and then we will tackle the frosting. Just follow each step and everyone will think you are a true pastry chef.

BUTTER CAKES

Ingredients:
32 tbsp soft butter, or a little over four sticks (450 g)
2 cups sugar (450 g)
4 tsp vanilla extract
6 eggs
4 cups sifted flour (380 g)
1 1/3 cups milk (315 ml)

Directions:

• Pre heat the oven to 175 degrees.

• Prepare two 9 inch round pans with either baking paper or butter.

• Use a hand mixer to beat butter, eggs, sugar and vanilla in a large mixing bowl. Be sure to add one egg at a time to best blend the ingredients.

• Add half the milk & flour, and fold into the mix with a rubber spatula.

• Once these ingredients are well blended, fold the rest of the milk and flour into the mix.

• When the cake mix is completely blended, pour it into both cake pans and smooth over the top to make a clean and even top edge.

• Bake for 55 minutes at 175 degrees, using a fork or toothpick to test the center at the end of the 55 minutes.

• If the fork or toothpick has wet cake batter when you pull it out of the cake, continue to bake it for another five minutes.

• Let the two cakes rest outside of the oven for 20 minutes.

ICING

Ingredients:
2 cups sour cream (454 g)
1 ½ cups sugar (338 g)
4 cups shredded coconut (300)

**Adding a few drops of red food coloring will give the cake a fun pink hue that is perfect for a little girl's birthday party.

Directions:
• In a large mixing bowl, gently mix all ingredients together.

• Be sure to wait for at least 20 minutes for the cakes to cool before spreading on the frosting. To be on the safe side, set the two cakes in the fridge for a few minutes to cool.

• It is very important to frost one butter cake at a time. Set one cake on the plate you will serve the cake on. Set the other cake on any plate.

• Frost the cake that will be on the bottom first. Completely cover the cake, adding a thick layer to the top.

• Frost the sides and part of the top of the top layer.

• Using a large cake knife, or flat spatula, gently pick up the top layer of cake and set it down on the bottom layer.

• Frost the top of the cake.

• Top with a birthday candle and keep chilled in the refrigerator.

Friday, 10 February 2012

All that Glitters is Not Gold


Recently in UK caking circles there seems to have been a bit of a stir about glitter on cakes - is it edible or not?


Often packaging has been confusing or misleading, and the situation hasn't been helped by people seeing TV chefs using the stuff with gay abandon on their creations.


The Foods Standards Agency (FSA) has decided to take a close look at what is going on. You might like to read this letter from the FSA to the Director of Trading Standards regarding the misuse of these products.


In very simple terms, there are glitters (and dusts) on the market which are labelled as being foodsafe and 'non-toxic'. These are not the same as 'edible'. What it means is that they are safe to come into contact with food items, but they are not designed to be consumed (although  if consumed they aren't toxic). These glitters are intended to be removable decoration, not consumed along with the food item.


My black and white shoe cake is an example of non-toxic glitter being used in the correct way - while being perfectly food safe, the shoe is not intended to be eaten and was removed completely from the cake before consumption.


At Canterbury Cakes you may see glittery decorations, which can be easily removed (and when you collect your cake you will be advised as such), but you will never see our any of our cakes with glitter applied in a way that it cannot be removed  - as a result, perhaps the cakes may not be as pretty and sparkley as some things you may see on the web, but I take the safety of my clients very seriously and when you think about what glitter actually is (see what Wikipedia has to say), small particles of plastic and metal, would you really want to be eating it? I certainly wouldn't!   

Wednesday, 8 February 2012

How to Make Coral for a Novelty Cake

I am decorating a nautically themed cake this week and the great thing about this kind of cake is that you can include loads of little details, which is always good fun. As well as obvious sea-life such as fish, crabs and seaweed, I like to add the impression of a coral reef as I think this sets off the theme beautifully. I used this technique previously when making Emily's Octonauts Cake and it really added something to the impact of the cake. I'm not sure where I picked up the technique (so I unfortunately can't credit anyone), but it's simple and quick and I am sure you will love it!  


So, all you need to make some realistic(ish) looking coral is some royal icing (any colour will do; the more the merrier!) and some grape stalks...yes, you read that right, grape stalks!


Cut the big grape stalk into smaller pieces that you think will look interesting 


Then go to work piping the royal icing onto it - it isn't an exact science so just stick it on there and you can always use a cocktail stick to manipulate it around the 'branches' a little if it's not looking quite to your liking


Once it's covered all over, leave it to dry and then


arrange it with other coloured corals, a bit of sea-life and some weed - voila, a mini-coral reef!


What do you think?