Sunday, 26 February 2012

Most Popular Cake?

I frequently am asked if there is a particular cake which I have requests for time and time again. Unsurprisingly, I think, chocolate cakes are very popular and I am often given the remit of 'chocolate, chocolate & more chocolate'.


In these instances I usually suggest this design of cake. It is eminently adaptable and so can be individualised to each client depending upon their budget and degree of 'chocolateyness' required. The ultimate is to use Belgian chocolate cigarillos around the edge of the cake and this has become a popular choice for wedding cakes; but for occasions with smaller budgets, there are plenty of alternatives available which still give a stunning looking cake. It is also a good design option for cakes for men, who obviously don't want anything frilly & fussy! 

In the picture above the client chose chocolate fingers and crushed flake, but I have seen many different chocolate snack bars used for the edging and it is always effective. The version of this cake that I have done with the biggest 'wow factor' has to be this three tier birthday cake:   


The lines on the cafe-curls really add to the impact of the design and are a nice contrast to the concentric circles created by the chocolate balls used for the topping. The chocolate sponges were filled with chocolate ganache to give a really luxurious edge to the mouth-feel of the cake - yum yum! 


Wednesday, 22 February 2012

Cheese and Bacon Plait - Baking with Kids

Although it isn't cake, this fits in with my baking with kids theme that I am currently running with. I love pastry, particularly savoury puff pastry dishes. So one lunchtime last week we decided to make a savoury plait. It turned out to be really easy and absolutely DELICIOUS!


We grated some cheese and chopped up some onions, and then rolled out a sheet of puff pastry.


Then, using a sharp knife, we scored the pastry along its length (being careful not to cut right through it) so that it was marked into three sections. 


Starting with the bacon, we put the filling in the middle section and then cut diagonally along the two remaining sections (cutting right through this time).


Using a little beaten egg as 'glue' we then folded a strip over from each side to give the impression the pastry had been plaited.


Finally, we brushed egg over the finished plait and popped it in the oven at approx 180C for half an hour.


There were no left-overs!


Thursday, 16 February 2012

American Style Cheesecake - Baking with Kids

...or, if my son had been naming this post, it would be


How to Make a Munchy-Crunchy-Cake

which is what he decided to call the cake half way through making it.

A little while ago I discovered Renee's blog (Kudos Kitchen by Renee) and was particularly intrigued earlier in the week when she posted a recipe for malted Milk Ball Cheesecake. In the UK cheesecake recipes aren't usually cooked, but it seems that American style cheesecakes are a baked delicacy. I love malty flavoured things, so I thought this would be a brilliant recipe to try out with the kids. I've changed it slightly...Europeanised it a little I guess, but hopefully not enough that it's untrue to its origins.

You can see Renee's original recipe here; my recipe is below:


For the base:

choc chip cookies (2 packets - approx 400g total)
white OvaltineTM powder (1 tablespoon )
melted butter (85g)

For the filling:

mascarpone cheese, softened to room temp (500 g)
self raising flour (1.5 tablespoons)
MaltesersTM (a 230g pouch)
white OvaltineTM powder (2 tablespoons)
caster sugar (225g)
crème fraiche, at room temperature (100g)
vanilla extract (few drops)
3 large eggs, at room temperature
grated chocolate for topping


Renee's recipe tells you to put the cookies in the food processor & whizz them up, but it's much more fun to put them in a bag, arm your three-year-old with a rolling pin and tell him to whack them to bits. In this photo it looks like he's rolling them but he was actually perfecting a two handed smashing action!!


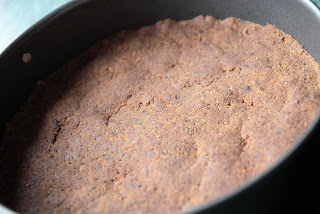
We then combined the cookie bits with the butter and the OvaltineTM powder in the food processor and blitzed them until the mixture started to come together in clumps. We then squished it all down into a 9" baking tin. We popped it in the oven at approx 170C for around ten minutes and then set it aside to cool a little.


Meanwhile, we got on with making the filling. With Mrs B's help we whipped the mascarpone, flour, OvaltineTM powder and the sugar into  a lovely creamy mixture. We then added the crème fraiche and vanilla and lightly mixed them in (although there is a certain lack of finesse in a three-year-old controlling the on-off button of a powerful mixer!). 


We then added the eggs one at a time, slowly mixing them well in, before adding the MaltesersTM. Renee's recipe calls for the balls to be chopped in half...however, the unbridled enthusiasm of my son resulted in the whole pouch being emptied straight in to the bowl and mixed in:


We then poured the mixture into the tin and popped it in the oven at somewhere between 170-180C for an hour. I'm guessing that had we chopped the balls they wouldn't have all floated to the surface...


After an hour it came out looking like this:


and smelling DELICIOUS!!!

Although unplanned, the fact that the MaltesersTM formed a lovely caramelised layer on top of the smooth creamy-cheesy layer really made this for me, and I think it suits the munch-crunchy-cake title quite well! I think I am definitely a convert to baked cheesecake. It is quite different to what the British would usually call cheesecake, but it is worth the extra time and effort to make it - yum!!   


Tuesday, 14 February 2012

Chocolate & Date Brownies - Baking with Kids

It's half term this week which means I have the children at home with me. Luckily I don't have any cake orders this week! The boys always show a great deal of interest in my baking, so I thought they would probably enjoy having a go at making brownies and decided to make it our 'project' this morning. So after a bit of a protracted amble down to the village shop (sucessfully fending off the numerous pleas for a 'special treat' - obviously making brownies wasn't a special enough treat in itself!) I managed to install them in the kitchen.

It's fitting that the gorgeous little apron and chef's hat set that we have says 'I love Santa' as it seems to be Christmas all year round in our house...after 12 months of trying I still haven't managed to sucessfully remove the Postman Pat Christmas Stories CD that tortures me every morning in the car, and the boys are frequently known to be humming and singing 'Jingle Bells' in the height of summer. The recent snow had them utterly convinced that Father Christmas was going to be putting in a reappearance at any minute because 'It always snows at Christmas!'

This is the recipe we were following:


Unsalted butter (250g/9oz)
Dark chocolate (275g/10oz)
Caster sugar (275g/10oz)
Three large eggs
Vanilla extract (1 tsp)
Plain flour (225g/8oz)
Salt (0.5 tsp)
Chopped dates (a 'handful')


First we melted the chocolate and the butter together and set the mixture aside to cool slightly. In the meantime, we beat the sugar, eggs and vanilla extract together in Mrs B my trusty mixer (named after none other than Mrs Beeton).

Mrs B causes no end of fascination to my eldest - he could spend all day watching things whizz around in there!
 
We kept mixing on a medium speed until the mixture was pale and fluffy. Then we added the slightly cooled chocolate mixture


and mixed it all in. Finally, we stirred in the flour using a metal spoon. We cooked the mixture for about 30 minutes at 180C until it was just set. We left it to cool in the tin for about 10 to 15 minutes and then turned it out onto a cooling rack to finish.


We were all delighted with the end result - despite the concerns of the boys that I was somehow contaminating their creation by insisting upon the addition of the dates!

Of course then, as far as the boys were concerned, it was the best bit - licking out the bowl! And the worst bit for me - the washing up...


 Thankfully he took his hat off first!!! 

Sunday, 12 February 2012

Guest Post - How to Make a Cute Coconut Cake

I am very excited today to be hosting my first ever guest post. Damian Wolf  is a part time blogger and online enthusiast. He contributes to many blogs, including cake decorating course Sydney , which is considered as one of the sweetest Australian websites. He has kindly offered to share with us his recipe for a scrummy coconut cake - read on below...


You will be the hit of the party or get together with this fantastically creative and delicious coconut cake recipe. Just about everyone loves coconut, and just about everyone loves cake. When these two favourites collide, it is like tasting a sweet tropical paradise. With its sprinkled coconut icing, this scrumptious desert adds a special touch to any celebration. This coconut cake takes the cake indeed!

Don’t worry if baking is not your specialty. This recipe is foolproof and very easy to follow. First, we will bake the two layers of butter cake and then we will tackle the frosting. Just follow each step and everyone will think you are a true pastry chef.

BUTTER CAKES

Ingredients:
32 tbsp soft butter, or a little over four sticks (450 g)
2 cups sugar (450 g)
4 tsp vanilla extract
6 eggs
4 cups sifted flour (380 g)
1 1/3 cups milk (315 ml)

Directions:

• Pre heat the oven to 175 degrees.

• Prepare two 9 inch round pans with either baking paper or butter.

• Use a hand mixer to beat butter, eggs, sugar and vanilla in a large mixing bowl. Be sure to add one egg at a time to best blend the ingredients.

• Add half the milk & flour, and fold into the mix with a rubber spatula.

• Once these ingredients are well blended, fold the rest of the milk and flour into the mix.

• When the cake mix is completely blended, pour it into both cake pans and smooth over the top to make a clean and even top edge.

• Bake for 55 minutes at 175 degrees, using a fork or toothpick to test the center at the end of the 55 minutes.

• If the fork or toothpick has wet cake batter when you pull it out of the cake, continue to bake it for another five minutes.

• Let the two cakes rest outside of the oven for 20 minutes.

ICING

Ingredients:
2 cups sour cream (454 g)
1 ½ cups sugar (338 g)
4 cups shredded coconut (300)

**Adding a few drops of red food coloring will give the cake a fun pink hue that is perfect for a little girl's birthday party.

Directions:
• In a large mixing bowl, gently mix all ingredients together.

• Be sure to wait for at least 20 minutes for the cakes to cool before spreading on the frosting. To be on the safe side, set the two cakes in the fridge for a few minutes to cool.

• It is very important to frost one butter cake at a time. Set one cake on the plate you will serve the cake on. Set the other cake on any plate.

• Frost the cake that will be on the bottom first. Completely cover the cake, adding a thick layer to the top.

• Frost the sides and part of the top of the top layer.

• Using a large cake knife, or flat spatula, gently pick up the top layer of cake and set it down on the bottom layer.

• Frost the top of the cake.

• Top with a birthday candle and keep chilled in the refrigerator.

Friday, 10 February 2012

All that Glitters is Not Gold


Recently in UK caking circles there seems to have been a bit of a stir about glitter on cakes - is it edible or not?


Often packaging has been confusing or misleading, and the situation hasn't been helped by people seeing TV chefs using the stuff with gay abandon on their creations.


The Foods Standards Agency (FSA) has decided to take a close look at what is going on. You might like to read this letter from the FSA to the Director of Trading Standards regarding the misuse of these products.


In very simple terms, there are glitters (and dusts) on the market which are labelled as being foodsafe and 'non-toxic'. These are not the same as 'edible'. What it means is that they are safe to come into contact with food items, but they are not designed to be consumed (although  if consumed they aren't toxic). These glitters are intended to be removable decoration, not consumed along with the food item.


My black and white shoe cake is an example of non-toxic glitter being used in the correct way - while being perfectly food safe, the shoe is not intended to be eaten and was removed completely from the cake before consumption.


At Canterbury Cakes you may see glittery decorations, which can be easily removed (and when you collect your cake you will be advised as such), but you will never see our any of our cakes with glitter applied in a way that it cannot be removed  - as a result, perhaps the cakes may not be as pretty and sparkley as some things you may see on the web, but I take the safety of my clients very seriously and when you think about what glitter actually is (see what Wikipedia has to say), small particles of plastic and metal, would you really want to be eating it? I certainly wouldn't!   

Wednesday, 8 February 2012

How to Make Coral for a Novelty Cake

I am decorating a nautically themed cake this week and the great thing about this kind of cake is that you can include loads of little details, which is always good fun. As well as obvious sea-life such as fish, crabs and seaweed, I like to add the impression of a coral reef as I think this sets off the theme beautifully. I used this technique previously when making Emily's Octonauts Cake and it really added something to the impact of the cake. I'm not sure where I picked up the technique (so I unfortunately can't credit anyone), but it's simple and quick and I am sure you will love it!  


So, all you need to make some realistic(ish) looking coral is some royal icing (any colour will do; the more the merrier!) and some grape stalks...yes, you read that right, grape stalks!


Cut the big grape stalk into smaller pieces that you think will look interesting 


Then go to work piping the royal icing onto it - it isn't an exact science so just stick it on there and you can always use a cocktail stick to manipulate it around the 'branches' a little if it's not looking quite to your liking


Once it's covered all over, leave it to dry and then


arrange it with other coloured corals, a bit of sea-life and some weed - voila, a mini-coral reef!


What do you think?


Monday, 6 February 2012

'Tis the Season to be Blogging


This week three of my friends joined the blogosphere. 


The first is Leanne, who has joined the world of food blogging - she aims to use her little corner of cyberspace to inspire other mums with her collection of recipes and photos of the delicious dishes she creates. It can be difficult for mums of young children to come up with dishes which are healthy and wholesome, but also at the same time be tempting for both adult and toddler palates, so I am sure that Leanne's posts will be very well received!


Secondly, is Tasha, who like me is a cake decorator running her own business. I first met Tasha when doing the PME Diploma in sugar flowers last year and we discovered that we actually both worked for the same corporate giant...similarly were putting into place plans for our future 'on the outside'. Tasha's first post is of a fabulous castle wedding cake that any bride would be over the moon with - go check it out!


Lastly, but not leastly, is Ashleigh. Occasionally in life, if you are lucky, you come across someone with such drive and energy that in just a few short years they manage to achieve more than most people manage in a lifetime. I suspect that Ashleigh is going to be one such individual. She is the driving force behind The Canterbury Toyshop, which only came into being towards the end of last year but is turning into a roaring success; but not only is she blogging about the ethos and values she holds dear in her running of the toyshop, she is also blogging about her other passion, being a mum. I really don't know how she finds enough hours in the day (have you got a time machine tucked away somewhere Ashleigh?)


I wish all three of my friends all the best with their four new blogs. I hope that we can all help and support each other along our journey out into the blogosphere, and have a lot of fun as we go! 


Image: renjith krishnan / FreeDigitalPhotos.net

Sunday, 5 February 2012

Personalised Decorated Biscuits


I might have mentioned, once or twice

that I love the idea of decorating biscuits. 

I have been an avid follower of Sugarbelle's blog and, more recently, Lila Loa. Their work is inspirational and it amazes me what they are able to do with a 'cookie'. Every time I read one of their posts I get all enthusiastic about the idea of giving it a go, but then procrastination usually sets in....but not this weekend. A friend was celebrating her birthday so I decided to have a go at decorating  some personalised biscuits for her.

I figured that starting with flowers would be the best bet , as I was hoping they would be fairly forgiving. I really enjoyed icing these and Trudy was very surprised and delighted when I presented them to her. I've got a long way to go before I could even dream of approaching the standard of the two ladies above, but my first few tentative steps haven't been too scary...Yayyyy!


Thanks to DesiComments.com for the emoticons

Friday, 3 February 2012

How to Make a Gumpaste Wizard - Tutorial


The finishing touch to the castle cake (see tutorial How to Make a Castle Cake - Part 1 and How to make a Castle Cake - Part 2) was the wizard sitting on the top so here is how I made him:

First I rolled a ball of gumpaste into an appropriate size for his body, gently moulding it into a a flattened pear-shape.

Then, using my thumb and forefinger, I flared out the bottom to give the impression of some movement, so it would look like he was wearing a gown.


I then rolled out two small tear-dropped shaped balls of black gumpaste and stuck them into place under the gown. I used the dresden tool to put in some folds around the shoes. 


I always like to make sure that the heads of my figures are secured well onto the body while drying, so I inserted a spaghetti stick through the body (this can also help prevent sagging).


To make his head I rolled a ball of flesh coloured fondant and used a cocktail stick to make a little hole where his nose would be. I then rolled a small tear-dropped shaped piece of flesh coloured fondant and put it in place to make his nose. I used a cocktail stick to give the nose nostrils. The eyes are simply small balls of white gumpaste upon which are glued even smaller balls of black gumpaste (I used sugar glue, but you could just as easily use water). I fashioned his eyebrows from small tapering sausages of white gumpaste and used the dresden tool to give them some texture once I'd stuck them into position. Finally, I put his head in place and was then able to cut off the excess spaghetti, leaving just enough to support his hat.  


Of course, being a very wise old wizard, he had to have a substantial beard. I made this from a long tapering sausage of white gumpaste, which I then added texture to using the dresden tool.


The beard was too long when I first held it against him, so I chopped the end until I got to a length that I was happy with and then attached it to his face just under his nose.


I then attached a moustache above it (again using the dresden tool to texture it and coax it into position) and gave him the suggestion of a mouth through all that facial hair!


I then got carried away with all this hair and started putting it on his head, completely forgetting that I had intended to put a cloak on him, so next time I would do that step first to make things easier! So, using similar principles to the beard, I filled his head with hair.


I then rolled a thing piece of darker gumpaste and cut a cloak out of it. I did this freehand, but you may want to make yourself a template to ensure it's even.

Luckily, when I came to attach the cloak, the hair was still soft enough that I could manipulate it out of the way so my earlier eagerness didn't result in disaster (phew).


I then gave him arms. To make these I rolled two tear dropped pieces of gumpaste and then fluted the ends using my thumb and forefinger to give the appearance of the long sleeves. Using the small ball tool, I made holes in the end for his hands. As his arms were quite heavy, once they were glued in place, I supported them with sponges until they were dry enough to support themselves. 


For his hat, I rolled a thin piece of gumpaste and cut out a disk for the rim. I then rolled a tear-drop shaped piece of gumpaste, which I thinned to almost a point at the end, to make the body of his hat. It simply slotted into place on top of the disk and was supported by, and completely covered, the last part of the spaghetti that had been protruding out of his head.


Finally, he needed some hands. If you check out my earlier post (Gumpaste Hands) there is a great link to a Lorraine McKay tutorial on making hands which I have found invaluable and I am sure you will find interesting at the very least.
To make hands, you start with two tear-dropped shaped pieces of gumpaste (everything seems to be tear-drop shaped today, doesn't it?) and you flatten them out at one end so that they have an almost paddle shape.


Then, using a knife or a scalpel (it was a scalpel in this case as these hands were tiny!) cut the paste to give rudimentary fingers and thumbs.


Next is the tricky bit, and where Lorraine's tutorial is really good at demonstrating the technique. To make the fingers look more realistic, you have to gently roll each individual finger, slightly pulling to elongate and tapping the end to shape. In the picture below you can see the difference between the shaped and the unshaped fingers. 


Once you get the hang of it and can do this step relatively quickly, the gumpaste should still be flexible enough for you to position the fingers into realistic poses. It's not so clear below because of the sponge in the way but I made a little magic wand for the wizard to hold and was able to manipulate the fingers so that he was gripping it.


I allowed the figure to dry overnight before positioning him on top of the cake. By that time his arms and hands were dry enough to be able to support themselves without the help of the sponges.

I hope you have found this helpful. I would love to see some of your own creations!