This is the second part of my tutorial on how to make the castle cake pictured above. For the first part please see here.
Previously we made the turrets, covered and coloured the board and placed the cake in position; so now it is time to make the walls.
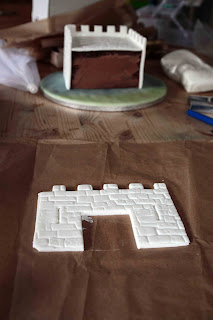
First, I rolled out a piece of fondant to the appropriate thickness (depends on how thick you like your icing on the cake) and cut it to the length of the side wall. The height was slightly taller than the height of the cake as I needed to allow for the battlements.


As with the turrets, I used the impression mat to give the look of a stone wall and I used a small square cutter to cut out the battlements. Then I cut in three arrow slits using the method described in part 1.
As the fondant is soft and it can be difficult to stop the shape distorting while handling it, I popped it into the freezer for a minute or two just to cool down and stiffen up. This allowed me to then put it in place without any stretching or distortion. You can use a very thin layer of buttercream, or jam or sugar glue to stick it in place; whatever is your preference.
I then put the roof in place - simply a square of fondant given the treatment with the impression mat. It is easier to put the roof on at the start rather than putting all the walls in place and then trying to put it in place.
I then added the second side wall.
Next was the back wall. When I measured the fondant for this I took into account the fact that the side walls had been added, so it was a little wider.
The front wall of course needed to incorporate the drawbridge and portcullis, so I used a large square cutter to cut out the space in the middle of the wall. I put just two arrow slits on this wall, one either side.
Once the wall was in place on the front, I put the turrets in place and then used the airbrush to give it all some colour

I cut a thin piece of black fondant to put into the space at the front. Even though I used the same sized cutter as I had on wall, it still needed a bit of tidying up to make it fit neatly. The thinness of the black gave the illusion of the walls being thicker and that there was something inside the castle. I knew that I wanted to add a portcullis, so it meant there would be room for this without it standing proud of the walls.

Any visible icing sugar marks were easily removed by painting a little leaf glaze onto the affected area (you could use vodka or even water, very sparingly, to do the same thing).
Next was the drawbridge. I cut out a thick square of brown fondant, using the same sized cutter as above, and marked it up to look like it was made of planks of wood.

It's the little details that always make the difference, so I always try to remember to put in things like nail marks etc. The colour of the fondant seemed a bit 'blocky' to me, given that the rest of the castle was airbrushed, so I used some brown dusting powder to give some texture and depth to the wood grain.

It slotted in to place perfectly. Just the right length to go over the moat and on to the grass :o)
Then it was just a case of adding some rope/chain to the drawbridge and the portcullis.
As the party was to have a magic theme, I decided that the castle needed a resident wizard. My next post will be a tutorial on how I made the wizard model that sat on top of the cake.
Until next time...


This is a great tutorial. I also put the fondant in the refrigerator to get cold, is much easier to handle. Thank you for sharing and for your comment over at my blog.
ReplyDeleteoh my goodness, that's amazing!!! We're Harry Potter fans here in our house and that would be just fabulous for any occasion at all (or no occasion!). I haven't done much with fondant, but I think I might give it a go after seeing this! Great instructions and pictures!
ReplyDeleteThis is a really good set of tutorials! I'm looking forward to seeing the wizard come to life!
ReplyDeletex
This is soo clever! Great job:-)
ReplyDelete